Table of Contents: Easy Homemade Crème Brûlée Dessert
Table of Contents: Easy Homemade Crème Brûlée Dessert
The Ultimate Step-by-Step Guide
Introduction — The Sweet Symphony of Crème Brûlée
If there were ever a dessert that captured both simplicity and sophistication, it’s crème brûlée. Beneath its glassy, caramelized sugar crust lies a silky-smooth custard that melts like velvet on the tongue. The moment your spoon cracks the top, you experience that satisfying crunch, followed by a wave of creamy vanilla decadence.
What makes crème brûlée magical isn’t just its taste — it’s the sensory drama. The sound, the aroma, the texture — all in perfect harmony.
Many think of this French classic as something only trained pastry chefs can achieve, but truthfully, this is a simple homemade dessert you can master on your first try. With just a few ingredients — cream, egg yolks, sugar, vanilla, and a touch of salt — you can create a dessert that feels like a fine-dining experience.
And if you already love silky delights like the coconut mousse dessert, you’re going to fall in love with the luscious elegance of crème brûlée.
What Exactly Is Crème Brûlée?
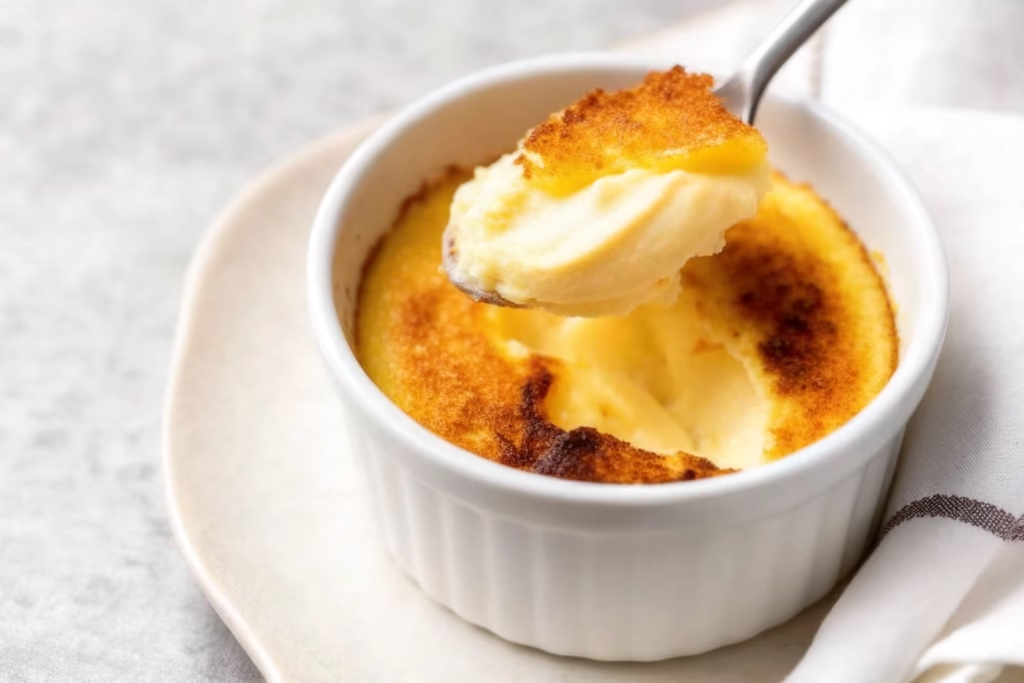
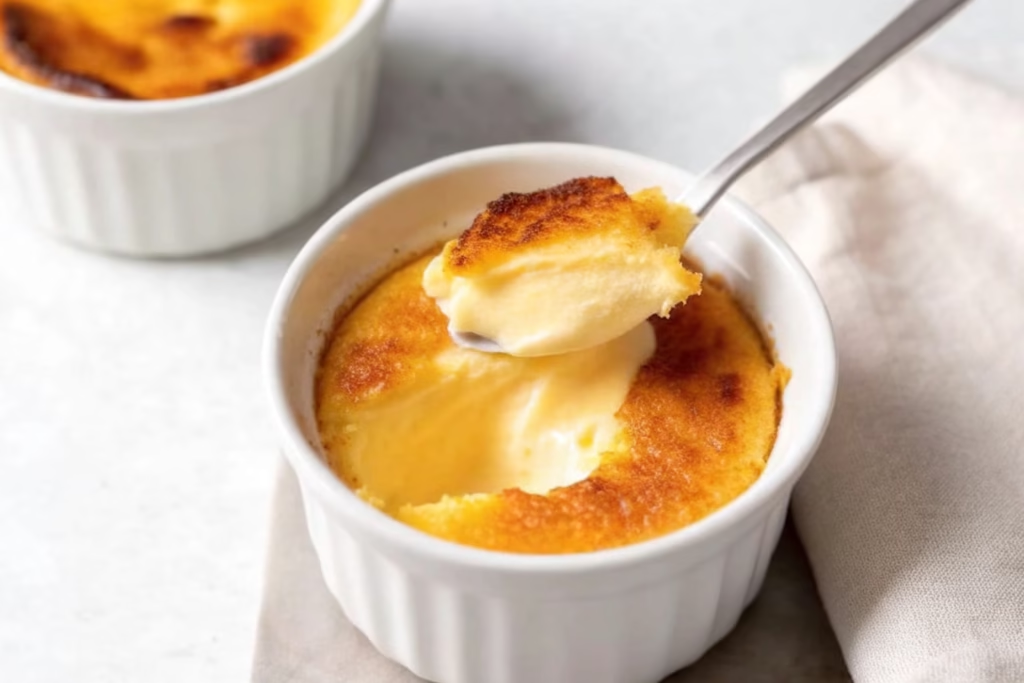
Literally translated from French, crème brûlée means “burnt cream.” It’s a baked custard dessert topped with a delicate layer of caramelized sugar. The magic lies in the contrast:
- The bottom is cool, creamy, and infused with the subtle sweetness of vanilla.
- The top is crisp, warm, and glass-like — a caramel shell that breaks beautifully under your spoon.
It’s that duality that makes it irresistible. If you appreciate desserts with a balance of textures — like the creamy peach dessert or easy tiramisu — this dish will feel like a revelation.
A Brief History of a Timeless Dessert
The origins of crème brûlée are as rich as the custard itself.
While France claims it, other countries have their own versions:
- Spain: Crema Catalana, flavored with citrus and cinnamon.
- England: Trinity Cream, famously branded with a hot iron crest.
- France: Refined and perfected in royal kitchens by the 17th century.
By the 1980s, crème brûlée had become a hallmark of luxury restaurants, and soon after, it was adopted by home bakers around the world. Its simple ingredients and show-stopping presentation made it a dessert that could bridge home comfort and haute cuisine.
Ingredients — The Power of Simplicity
| Ingredient | Purpose |
|---|---|
| 5 large egg yolks | Structure and richness |
| 3 cups heavy cream | The luscious, creamy base |
| ¾ cup granulated sugar | Sweetness and caramel crust |
| 1 ½ tsp vanilla extract | Fragrant flavor depth |
| Pinch of salt | Balances sweetness |
Optional Add-ins
- Espresso powder for mocha lovers
- Coconut extract for tropical flair
- Citrus zest for brightness
- Liqueurs like Grand Marnier or Amaretto for elegance
💡 Pro Tip: Use room-temperature eggs and pure vanilla extract — these small details transform the flavor.
Tools You’ll Need
- 6–8 ramekins (4–6 oz each)
- Large baking dish for the water bath
- Mixing bowls and whisk
- Fine-mesh strainer
- Kitchen torch or broiler
- Thermometer (optional but useful)
🔥 A torch provides precision — but your oven broiler can caramelize beautifully too.
Step-by-Step: How to Make Easy Homemade Crème Brûlée
1️⃣ Warm the Cream
In a saucepan, heat cream, vanilla, and salt just until steaming. Don’t let it boil. Remove from heat and let steep 10 minutes to infuse the flavor.
2️⃣ Whisk Yolks and Sugar
In a bowl, whisk egg yolks and ½ cup sugar until pale and slightly thickened. This step builds the custard’s foundation.
3️⃣ Temper the Mixture
Slowly pour the warm cream into the yolks while whisking constantly. Tempering prevents the eggs from scrambling — this is the key to a silky texture.
4️⃣ Strain and Pour
Pass the mixture through a fine-mesh sieve to remove any solids. Pour evenly into your ramekins.
5️⃣ Bake in a Water Bath
Place ramekins in a deep baking dish. Pour hot water around them until it reaches halfway up their sides. Bake at 325°F (160°C) for 30–40 minutes, or until the edges are set but centers wobble slightly.
6️⃣ Cool and Chill
Remove ramekins, cool on the counter, then refrigerate at least 4 hours (or overnight). The longer the chill, the silkier the texture.
7️⃣ Caramelize the Sugar
Right before serving, sprinkle each custard with 1–2 teaspoons of sugar. Torch until it melts and turns golden amber. Wait one minute for the sugar to harden.
✅ Chef’s note: Move your torch in small circles — patience creates that perfect glass finish.
Flavor Variations — Reinventing a Classic
One of crème brûlée’s biggest strengths is its flexibility. Here are some creative twists:
- Chocolate Crème Brûlée – Stir 2 oz melted dark chocolate into the warm cream.
- Coconut Crème Brûlée – Replace one-third of the cream with coconut milk for tropical richness.
- Pumpkin Spice Crème Brûlée – Add ½ cup pumpkin purée and cinnamon (see easy pumpkin desserts).
- Citrus Brûlée – Add orange or lemon zest for brightness.
- Espresso Brûlée – Mix in ½ tsp espresso powder for a café-inspired version.
Each variation preserves that creamy foundation while offering unique flair.
The Science of the Perfect Custard
Let’s go deeper — crème brûlée is more chemistry than magic.
- Egg yolks coagulate at 160–180°F, turning liquid cream into a firm custard.
- The water bath creates gentle, even heat, preventing curdling.
- Sugar caramelization occurs around 320°F, forming that irresistible crust.
By understanding the science, you control every detail — from texture to flavor depth.
Troubleshooting Tips
| Issue | Likely Cause | Solution |
|---|---|---|
| Curdled texture | Cream too hot when mixed | Temper slowly |
| Grainy custard | Overbaked | Lower oven temp |
| Runny custard | Undercooked | Bake 5 minutes longer |
| Uneven caramel | Sugar layer too thick | Sprinkle evenly |
| Cracked surface | Rapid cooling | Cool gradually before chilling |
💬 Pro Tip: Use a thermometer — the center should reach about 170°F (77°C) for ideal consistency.
Plating & Presentation
Presentation is half the pleasure:
- Serve with fresh berries or mint leaves.
- Add a drizzle of berry coulis for color contrast.
- Use powdered sugar for a professional touch.
- Serve alongside biscotti or a crisp butter cookie.
- Pair with dessert wine or espresso for a gourmet touch.
For winter holidays, crème brûlée pairs perfectly with a warm eggnog dessert dip or festive frozen peppermint dessert.
The Joy of Seasonality
Every season gives this dessert a new twist:
🌸 Spring: Infuse lavender or chamomile into the cream.
☀️ Summer: Top with berries or peaches like in creamy peach dessert.
🍂 Autumn: Mix pumpkin and spice for cozy fall warmth.
❄️ Winter: Add peppermint or serve beside eggnog dessert.
Nutrition Snapshot
| Serving Size | 1 ramekin |
|---|---|
| Calories | 330 |
| Fat | 27g |
| Sugar | 21g |
| Protein | 5g |
| Sodium | 70mg |
⚖️ Lighter option: Replace part of the cream with half-and-half for fewer calories and a lighter feel.
Expert Baker Tips
- Whisk gently to avoid bubbles.
- Always strain before baking.
- Bake in the center rack for even cooking.
- Chill overnight for best flavor.
- Use a cold custard + hot torch combo for perfect crack contrast.
🎯 Chef’s insight: Always torch right before serving — the caramel crust softens in the fridge.
FAQs — Based on “People Also Ask”
Q: Can I make crème brûlée without a torch?
Yes! Broil for 2–3 minutes until golden. Keep a close eye to avoid burning.
Q: Can I prepare crème brûlée in advance?
Absolutely — up to 2–3 days. Caramelize only when serving.
Q: Why is my custard runny?
It’s underbaked or under-chilled. Bake longer and chill overnight.
Q: Can I make it dairy-free?
Yes. Use full-fat coconut milk or cashew cream for a vegan-friendly version.
Q: Is it gluten-free?
Completely — traditional crème brûlée contains no gluten.
Perfect Pairings
Pair your crème brûlée with other FreshPlatez favorites:
- Easy tiramisu for a coffee-flavored complement.
- Coconut mousse dessert for tropical indulgence.
- Easy pumpkin desserts for autumn celebrations.
These combinations create a dessert spread that feels both luxurious and cohesive.
The Sensory Experience
Let’s pause for a moment of indulgence. You take your spoon, gently tap the top — crack.
A satisfying sound echoes as the caramel shell shatters. The custard beneath glistens, cool and silky. The warmth of burnt sugar melts into the creamy base, creating a mouthful that’s both warm and cold, crunchy and soft, sweet yet perfectly balanced.
That’s the essence of crème brûlée — an experience, not just a dessert.
Why Every Home Cook Should Master This Dessert
- Impressive yet easy. Only five ingredients.
- Naturally gluten-free. Great for everyone.
- Flexible. Infuse, flavor, or serve it your way.
- Elegant. Perfect for holidays or date nights.
- Reliable. Once you learn it, you’ll never forget.
The satisfaction of serving crème brûlée — hearing the crack, seeing the golden top — is unmatched.
The Art of Caramelization
Caramelizing sugar is an art form:
- Use fine sugar for even melting.
- Keep your torch about 2 inches from the surface.
- Move in circular motions.
- Allow it to rest for 60 seconds before serving.
If you love the thrill of torching, you can also caramelize other desserts like fruit tarts or the tops of cheesecakes for extra flair.
Cultural Significance — A Dessert for Every Era
Across Europe and North America, crème brûlée symbolizes refinement and celebration. It’s served at weddings, anniversaries, and holidays. Its popularity in restaurants made it a signature of skill — a mark of culinary craftsmanship.
In France, it remains timeless; in America, it’s become nostalgic — a reminder of 1990s fine dining and home-cooked romance.
Storing and Serving Tips
- Before torching: Refrigerate up to 3 days.
- After torching: Best enjoyed within 30 minutes.
- Leftovers: Keep chilled; don’t reheat — the caramel will melt.
When serving guests, prepare custards the night before, then caramelize live at the table — the flame show always wows.
Advanced Variations for Pastry Enthusiasts
Want to take your crème brûlée to gourmet level? Try these ideas:
- Earl Grey Infused: Steep tea leaves in cream.
- Honey Vanilla: Replace some sugar with raw honey for floral notes.
- Lavender & Lemon: A fragrant spring variation.
- Salted Caramel Brûlée: Add a sprinkle of sea salt after torching.
- Matcha Crème Brûlée: Whisk in matcha powder for a Japanese-inspired fusion.
Final Touch — Serving in Style
Presentation transforms crème brûlée from a dessert into a showpiece.
- Use vintage ramekins or espresso cups.
- Add edible gold dust for luxury.
- Serve with macarons or biscotti.
- Top with spun sugar for drama.
For themed dinners, you can even match it with your menu — tropical, holiday, or classic French.
Conclusion — The Sweet Science of Simplicity
Easy homemade crème brûlée isn’t just a recipe — it’s a celebration of patience, precision, and pleasure. It turns five simple ingredients into something extraordinary.
Each spoonful delivers that perfect harmony: warm caramel crunch followed by cool, creamy vanilla bliss. It’s rich, elegant, and endlessly adaptable — a dessert that elevates every occasion.
Whether you pair it with a coconut mousse dessert, enjoy it alongside an easy tiramisu, or serve it solo — crème brûlée always delivers perfection.
🔑 Key SEO Keywords
easy homemade crème brûlée dessert, classic French dessert, burnt cream recipe, vanilla custard, caramelized sugar topping, homemade crème brûlée, creamy dessert recipe, elegant dessert ideas, crème brûlée without torch, gluten-free desserts
PrintEasy Homemade Crème Brûlée Dessert
- Total Time: 2 heures 55 minutes
- Yield: 4 portions 1x
- Diet: Vegetarian
Description
Un dessert classique français, riche et onctueux, avec une crème vanillée soyeuse et une fine couche de sucre caramélisé croustillant.
Ingredients
- 2 tasses de crème entière
- 5 jaunes d’œufs
- 1/2 tasse de sucre en poudre
- 1 cuillère à café d’extrait de vanille
- 1/4 tasse de sucre pour caraméliser
Instructions
- Préchauffer le four à 160°C.
- Chauffer la crème à feu doux sans faire bouillir.
- Dans un bol, fouetter les jaunes d’œufs avec le sucre jusqu’à blanchiment.
- Ajouter la vanille puis verser la crème chaude progressivement en fouettant.
- Répartir la préparation dans des ramequins.
- Placer les ramequins dans un plat et ajouter de l’eau chaude à mi-hauteur.
- Enfourner pendant 35 à 40 minutes jusqu’à ce que la crème soit prise.
- Laisser refroidir puis réfrigérer au moins 2 heures.
- Saupoudrer de sucre et caraméliser au chalumeau avant de servir.
Notes
Pour une caramélisation parfaite, utiliser du sucre fin et servir immédiatement après le brûlage.
- Prep Time: 15 minutes
- Cook Time: 40 minutes
- Category: Dessert
- Method: Au Four
- Cuisine: Française
Nutrition
- Serving Size: 1 portion
- Calories: 390
- Sugar: 26g
- Sodium: 75mg
- Fat: 30g
- Saturated Fat: 18g
- Unsaturated Fat: 10g
- Trans Fat: 0g
- Carbohydrates: 28g
- Fiber: 0g
- Protein: 6g
- Cholesterol: 245mg
Keywords: crème brûlée, dessert français, vanille, classique, maison


